Blog· July 1, 2026
The $700 Solution: 1960s Kitchen Cabinet Makeover Guide
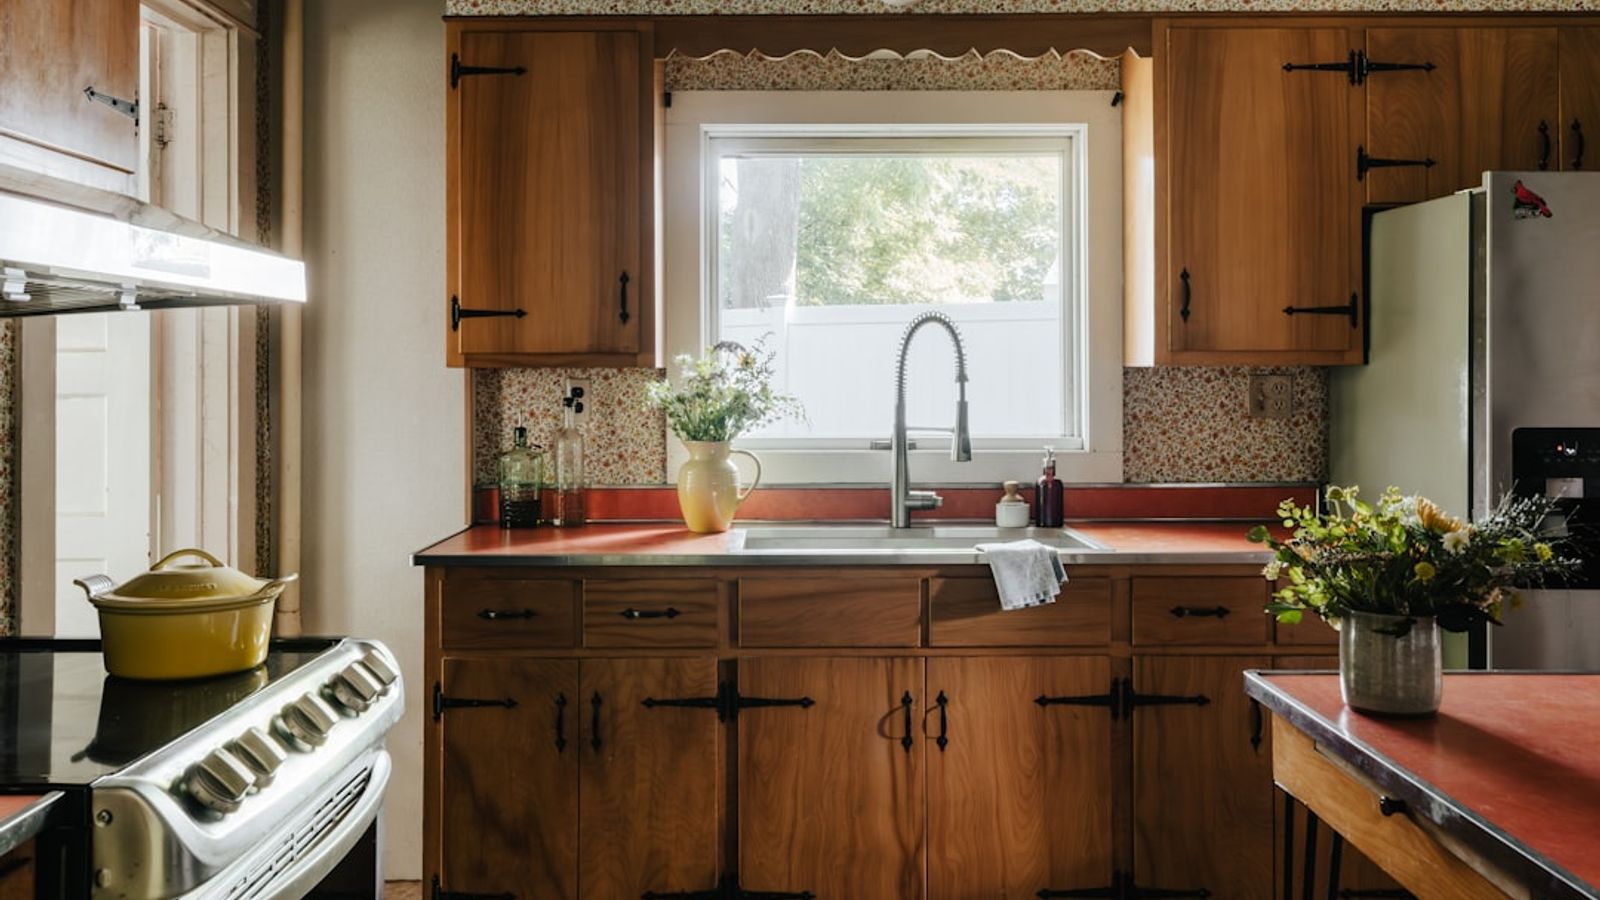
Your 1960s Kitchen Cabinets Don't Have to Stay Stuck in the Past
A 1960s kitchen cabinet makeover can cost as little as $700 — or as much as $55,000 — depending on how far you want to go.
Here's a quick look at your main options:
Approach
Estimated Cost
Best For
Paint + trim updates
$300–$700
Tight budgets, rental properties
Reface with new doors/fronts
$1,000–$5,000
Worn doors, solid cabinet boxes
No-demo refresh (hardware, flooring, backsplash)
$600–$2,000
Renters, preserving wood tone
Full professional renovation
$20,000–$55,000
Complete transformation, custom design
Most homeowners with solid original cabinet boxes don't need to replace everything. Small, targeted changes — new trim, fresh paint, updated hardware — can make a 1960s kitchen feel decades newer.
Those orange-toned wood cabinets, flat doors with routed details, scalloped canopies, and clunky exposed hinges are fixable. And if you're planning to stay in your home long-term, getting that kitchen working better for you now is worth every bit of effort.
I'm Henry Rouhana, founder of Sure-Fix Remodeling and a licensed general contractor with over 20 years of experience transforming dated kitchens — including countless 1960s kitchen cabinet makeover projects across the Lehigh Valley. In this guide, I'll walk you through every level of update, from a weekend $700 DIY refresh to a full renovation, so you can choose what's right for your home and budget.
Anatomy of a 1960s Kitchen: Common Cabinet Problems
Step into an untouched 1960s kitchen in Bethlehem or Phillipsburg, and you will instantly recognize the era. While mid-century homes were built with incredible structural integrity, their kitchens were designed around mid-century lifestyle habits and design trends that have not aged particularly well.
If you are living with original cabinetry, you are likely dealing with several of these classic 1960s design elements:
- Thin routed doors: Instead of classic Shaker-style recessed panels or completely flat modern slabs, 1960s doors often featured thin plywood with a shallow, routed decorative groove running a half-inch from the edge. This groove is a magnet for kitchen grease and instantly dates the space.
- Scalloped wood canopies: Usually located directly over the kitchen sink, these wavy, decorative wooden valances block light and make the ceiling feel lower than it actually is.
- Drop-down soffits (bulkheads): Builders in the '60s loved to construct drywall or wood-paneled boxes above the upper cabinets. These soffits eat up valuable storage space and create a heavy, crowded feeling.
- Orange-toned wood and worn laminates: Decades of ambering shellac, oil-based varnishes, or early plastic laminates have left cabinets with a distinct orange, honey-oak, or dark muddy-brown hue.
- Dated exposed hardware: Large, clunky, copper-toned or black plastic handles paired with heavy, surface-mounted self-closing hinges make the cabinet faces look busy and cluttered.
Updating these elements requires a strategic approach. As detailed in the DIY journey of updating original kitchen cupboards, trying to work around these quirks without a solid plan can lead to misaligned doors and endless frustration.
Planning Your 1960s Kitchen Cabinet Makeover: Paint, Reface, or Replace?
Before you pick up a paintbrush or a crowbar, you need to decide which level of makeover matches your budget, timeline, and physical capability. Let’s break down the three primary paths.
1. Painting & DIY Trim (The Budget-Friendly Route)
If your cabinet boxes are structurally sound and made of solid plywood, painting them is the most cost-effective solution. By adding simple trim to flat doors, you can mimic high-end Shaker cabinetry for a fraction of the price.
- Cost: $300 to $700.
- Effort: High. It requires deep cleaning, sanding, priming, and multiple topcoats.
- Best for: Budget-conscious homeowners and DIY enthusiasts.
2. Cabinet Refacing (The Middle Ground)
Refacing involves keeping your existing cabinet boxes but replacing all the doors, drawer fronts, and hardware with brand-new versions. The exposed face frames of the cabinet boxes are then covered with a matching wood veneer or laminate.
- Cost: $1,000 to $5,000 (DIY) or $8,000 to $15,000 (Professional).
- Effort: Moderate.
- Best for: Homeowners who want a completely different door style (like modern slab or true Shaker) without the mess of a full gut remodel.
3. Full Cabinet Replacement (The Complete Transformation)
A full replacement means tearing out everything down to the drywall and installing brand-new, custom-built cabinetry. This allows you to completely change your kitchen's footprint, add modern conveniences like deep pot drawers, and run your cabinets all the way to the ceiling.
- Cost: $20,000 to $55,000+.
- Effort: Professional installation required.
- Best for: Long-term homeowners looking to maximize home value, improve layout flow, and incorporate aging-in-place design principles.
Feature / Option
Painting & DIY Trim
Cabinet Refacing
Full Replacement
Average Cost
$300 – $700
$1,000 – $5,000 (DIY)
$20,000 – $55,000+
Time to Complete
3 to 7 days
2 to 5 days
3 to 6 weeks
Layout Flexibility
None
None
Unlimited
Storage Increase
Minimal (shelving only)
Minimal
Maximum (custom inserts)
DIY Friendliness
Very High
Moderate
Low (Requires Pros)
If you are considering a professional upgrade in the Pennsylvania or New Jersey area, we recommend exploring our Kitchen Remodeling Services to see how we can maximize your existing layout, improve storage efficiency, and bring your vision to life with high-quality materials and expert craftsmanship.
Step-by-Step DIY 1960s Kitchen Cabinet Makeover for Under $700
If you have decided to tackle a DIY cabinet transformation on a tight budget, this step-by-step method will help you achieve a high-end Shaker look for less than $700.
Step 1: Label and Remove Everything
Never try to paint cabinets with the doors attached. Unbolt the doors, remove all hinges and latches, and use painter's tape to label each door with a number that corresponds to its cabinet box. Put all screws and hardware into labeled plastic bags.
Step 2: Clean and Degrease
Sixty years of cooking oils, steam, and fingerprints will prevent paint from adhering. Scrub every square inch of the doors and cabinet frames with a heavy-duty degreaser like TSP (Trisodium Phosphate). Rinse with clean water and let dry completely.
Step 3: Apply Shaker-Style Trim
To disguise those dated routed grooves, you can apply thin wood lattice trim directly to the flat cabinet faces.
- Purchase 1/4-inch thick wood lattice strips from your local home improvement center.
- Measure the outer edges of your cabinet doors.
- Cut the strips to size. To avoid complicated mitered corner cuts, use simple butt joints (where the horizontal pieces sit flush between the vertical side pieces).
- Attach the trim using construction adhesive and a brad nailer with 5/8-inch nails.
- Fill any gaps, nail holes, and the old routed grooves with paintable wood filler. Sand smooth once dry.
Step 4: Sand and Prime
Lightly sand all surfaces with 120-grit sandpaper to scuff up the old varnish or laminate. Wipe away the dust with a tack cloth. Apply a high-quality bonding primer (such as Zinsser B-I-N or KILZ) to seal the wood and prevent old wood tannins from bleeding through your new paint.
Step 5: Paint with a Durable Enamel
For kitchen cabinets, standard wall paint will not hold up to daily wear and tear. Choose a self-leveling cabinet enamel, such as Behr Cabinet & Trim Enamel or Olympic One Paint-and-Primer. These formulas dry to a hard, smooth, factory-like finish that resists chipping. Apply two thin coats using a high-quality brush for the corners and a high-density foam roller for the flat panels.
For inspiration on managing a multi-day family DIY painting project, check out this real-world DIY kitchen remodel with painted cabinets, which highlights the importance of proper prep work and teamwork.
Era-Honoring Design Choices for Your 1960s Kitchen Cabinet Makeover
You don't have to completely erase your kitchen's mid-century heritage to make it feel fresh. Embracing "era-honoring" design elements is an excellent way to create a kitchen with personality, warmth, and retro charm.
Mid-Century Color Palettes
Instead of safe, modern builder-grade gray or bright white, consider colors that pay homage to the 1960s:
- Earth-Toned Greens: Soft sage, olive, or eucalyptus greens bring a natural, calming vibe that pairs beautifully with warm wood tones.
- Retro Turquoise and Aqua: A bold choice that instantly revives dark spaces. See how a splash of color can revive a space in this feature on colorful 1960s cabinets.
- Pastel Pink and Butter Yellow: Highly popular in early 1960s suburban tract homes, these tones feel cheerful when balanced with clean white countertops.
To see how a soft, earth-toned green paint can completely change the mood of a kitchen while keeping its vintage soul intact, take a look at the before-and-after photos in this green painted kitchen redo on Apartment Therapy and its companion piece on The Kitchn green cabinet makeover.
Materials and Finishes
- Vintage Formica: Modern laminate manufacturers still produce classic mid-century patterns, such as the iconic "Skylark" or linen-textured patterns, which offer incredible retro authenticity.
- Exposed Wood Elements: Consider keeping your upper cabinets painted white or cream while sanding down the lower cabinets to expose the natural birch or pine grain beneath.
Upgrading Hardware, Storage, and Surrounding Elements
A successful cabinet makeover goes beyond paint and trim. To make your kitchen truly functional for the modern day, you need to address how the cabinets operate and how they coordinate with the surrounding space.
Hardware Refreshes and Hinge Conversions
- The Rub 'n Buff Trick: If your original metal hinges and pulls are structurally sound but look tarnished, do not throw them away. Clean them with wire wool and apply a thin layer of Rub 'n Buff (a metallic wax finish available in gold, bronze, and antique silver) to instantly restore their luster.
- Soft-Close Concealed Hinges: If you hate the sound of slamming cabinet doors, swap your old exposed hinges for modern, concealed cup hinges with built-in soft-close dampening. This small upgrade makes old cabinets feel incredibly luxurious.
Smart Storage Solutions
You don't need a full demolition to improve your kitchen's storage capacity. Consider these easy retrofits:
- Pull-Out Wire Baskets: Install slide-out metal shelves inside deep lower cabinets so you don't have to get on your hands and knees to find pots and pans.
- Open Shelving: Remove the doors from one or two upper cabinet boxes, patch the hinge holes, and paint the interiors a contrasting accent color to display glassware.
Budget-Friendly Surrounding Updates
To make your updated cabinets pop, pair them with smart, low-cost surrounding finishes:
- Peel-and-Stick Backsplash: Cool-toned subway tile or geometric patterns can be installed over existing drywall in a single afternoon.
- Peel-and-Stick Flooring: If your original linoleum is stained or worn, high-quality luxury vinyl peel-and-stick tiles offer a durable, budget-friendly fix.
For a stunning example of how these elements come together without a messy demolition, read about this no-demo 1960s kitchen transformation. If you want expert guidance on coordinating colors, hardware, and lighting for a cohesive look, our team at Sure-Fix can assist through our Interior Design Services.
DIY Pitfalls and Lessons Learned from 1960s Remodels
Tackling a 1960s kitchen renovation can bring unexpected surprises. Before you start cutting into walls or ripping down trim, keep these critical safety and structural lessons in mind.
1. Asbestos and Lead Paint Hazards
Homes built in the 1960s frequently utilized materials containing asbestos (often found in resilient vinyl flooring, floor adhesives, and textured plaster ceilings) and lead-based paint.
- Action: If you plan to scrape old paint or tear up old flooring, purchase an inexpensive testing kit from a local home improvement center first. If tests return positive, consult a licensed abatement professional.
2. The Soffit Trap
That drop-down soffit above your cabinets might look like empty space, but builders often used them to hide horizontal runs of plumbing pipes, electrical wiring, or HVAC ductwork.
- Action: Before you plan to tear down a soffit to run your new cabinets to the ceiling, cut a small inspection hole and use a flashlight to see what is inside.
3. Load-Bearing Walls
If your kitchen feels dark and isolated, you might be tempted to knock down the wall separating it from the living room. However, in 1960s ranch and split-level homes, these central walls are almost always load-bearing.
- Action: Removing a load-bearing wall requires structural engineering, temporary support walls, and local building permits. An excellent, budget-friendly alternative is to cut a pass-through window (as pictured above). This costs around $500 to $1,000 as a DIY project but delivers the same open, connected feeling without compromising your home's structural integrity.
For more deep dives into structural renovation safety, local building permits in Easton, Bethlehem, and Phillipsburg, and design inspiration, check out our Home Remodeling Blog.
Frequently Asked Questions about 1960s Kitchens
Can you update 1960s cabinets without painting them?
Yes! If you love the look of natural wood but hate how dated your kitchen feels, you can preserve the original wood cabinets by changing the surrounding elements.
The secret is color contrast. Warm, orange-toned wood cabinets look dated when paired with beige walls and yellow-toned countertops. If you install cool-toned peel-and-stick flooring (like slate gray), a crisp white subway tile backsplash, and sleek matte black hardware, the warm wood tones will instantly look rich, intentional, and modern.
How much does a professional 1960s kitchen remodel cost?
A full, professional gut renovation of a 1960s kitchen typically ranges from $25,000 to $55,000+. This includes custom cabinetry, structural wall modifications, updated electrical wiring to meet modern safety codes, quartz or marble countertops, and new appliances. The typical timeline for a project of this scale is 8 to 12 weeks.
How do you handle 1960s cabinet hinges during a makeover?
Original 1960s hinges are usually surface-mounted and highly visible. If you are painting your cabinets, you have two choices:
Keep and Refinish: Clean them thoroughly and use Rub 'n Buff or spray paint to change them to a modern matte black or satin brass finish. Reinstall them in their exact original locations to avoid door alignment issues.
Convert to Concealed: Fill the old exterior hinge screw holes with wood filler, sand them flat, paint over them, and use a concealed hinge jig to drill new cup holes on the inside of the cabinet doors for modern, hidden soft-close hinges.
Conclusion
Whether you choose a $700 weekend DIY paint project or a full-scale professional transformation, updating your 1960s kitchen cabinets will completely change how you experience your home. You don't have to live with dark, non-functional spaces or clunky, orange-toned wood.
If you live in the Lehigh Valley, Easton, Bethlehem, Allentown, or across the river in Phillipsburg, NJ, and want to discuss how to bring your kitchen into the modern era, we are here to help. At Sure-Fix Remodeling, we specialize in high-quality, full-service kitchen transformations, custom cabinetry solutions, and aging-in-place modifications designed to make your home beautiful and functional for a lifetime.
Ready to start planning your dream kitchen? Contact us today to explore our Kitchen Remodeling Services and schedule a consultation at our local design showroom.