Blog· August 26, 2026
The Complete Guide to Converting a Cellar
Essential Planning and Permits for Converting a Cellar
Converting a cellar into safe, legal living space involves five essential steps: verifying ceiling clearance and underpinning footings if excavation is needed, installing internal or external structural waterproofing and drainage, securing building and emergency egress permits, integrating below-grade MEP systems and thermal insulation, and finishing the interior layout. When planning a comprehensive home remodeling project that touches the foundation, every structural modification and utility extension must comply with local municipal building departments across Pennsylvania and New Jersey.
Before demolition or digging starts, contractors assess property boundaries, ceiling clearance, structural load paths, and existing utilities.
Building Codes, Egress, and Structural Permits
Transforming an unfinished utility cellar into legal, habitable space requires pulling dedicated building, electrical, and plumbing permits. Municipal inspectors evaluate your project against International Residential Code (IRC) standards to ensure life safety.
The most critical regulatory requirement is an emergency escape and rescue opening (egress). If you plan to incorporate a bedroom or dedicated living area, building codes require at least one direct path to the outdoors independent of the interior stairs. Meeting this standard typically involves cutting through your foundation to install an egress window paired with an exterior window well that features integrated step ladders and positive drainage.
According to standard building regulations for cellar conversions, converted rooms must also provide:
- Proper fire-rated drywall separation between utility rooms and living zones
- Interconnected, hardwired smoke and carbon monoxide detectors with battery backups
- Safe, code-compliant staircases featuring consistent tread rises, run depths, graspable continuous handrails, and minimum overhead clearance
Headroom Requirements and Underpinning Foundations
Older historic homes throughout the Lehigh Valley, Northampton County, and surrounding areas often feature stone or brick cellars with low ceiling clearances originally intended solely for mechanical equipment or coal storage. Most modern residential codes require a minimum finished ceiling height of 7 feet (or 2.1 to 2.3 meters) for habitable rooms, with specific allowances for dropped ducts and beams.
If your existing head height falls short, gaining vertical space requires lowering the floor slab through excavation. Because digging below existing footings can compromise structural stability, your contractor must execute structural underpinning:
Trial Pits: Engineers dig exploratory test holes around existing footings to verify soil bearing capacity and existing foundation depth.
Sequential Metre Pins: Crews excavate beneath the existing foundation in staggered, alternating one-metre sections (typically numbered in sequence 1-2-3).
Concrete Pouring: High-strength concrete is poured into the excavated section up to within a few inches of the existing footing, then dry-packed with non-shrink mortar to transfer structural loads safely.
Slab Excavation: Once all pins cure, the central floor area is excavated down to the target depth, making room for new gravel drainage beds, rigid insulation, and a reinforced concrete slab.
Waterproofing and Moisture Management Systems
Waterproofing is the single most critical investment in any subterranean project. Below ground, groundwater and saturated soil exert hydrostatic pressure against foundation walls. Simply rolling paint over damp masonry will inevitably fail because water will force its way through microscopic pores, resulting in peeling coatings, efflorescence, and mold.
Type A Barrier Tanking vs. Type C Cavity Drainage
Modern structural waterproofing follows established standards that classify below-grade protection into distinct methodologies. Deciding between barrier systems and water management systems depends on your home's foundation type, soil conditions, and water table.
Waterproofing Feature
Type A: Barrier Tanking
Type C: Cavity Drainage Membrane
Core Mechanism
Physical impermeable barrier bonded to walls/floors
Drained management cavity that catches and redirects water
Hydrostatic Resistance
Holds back water pressure directly at the masonry face
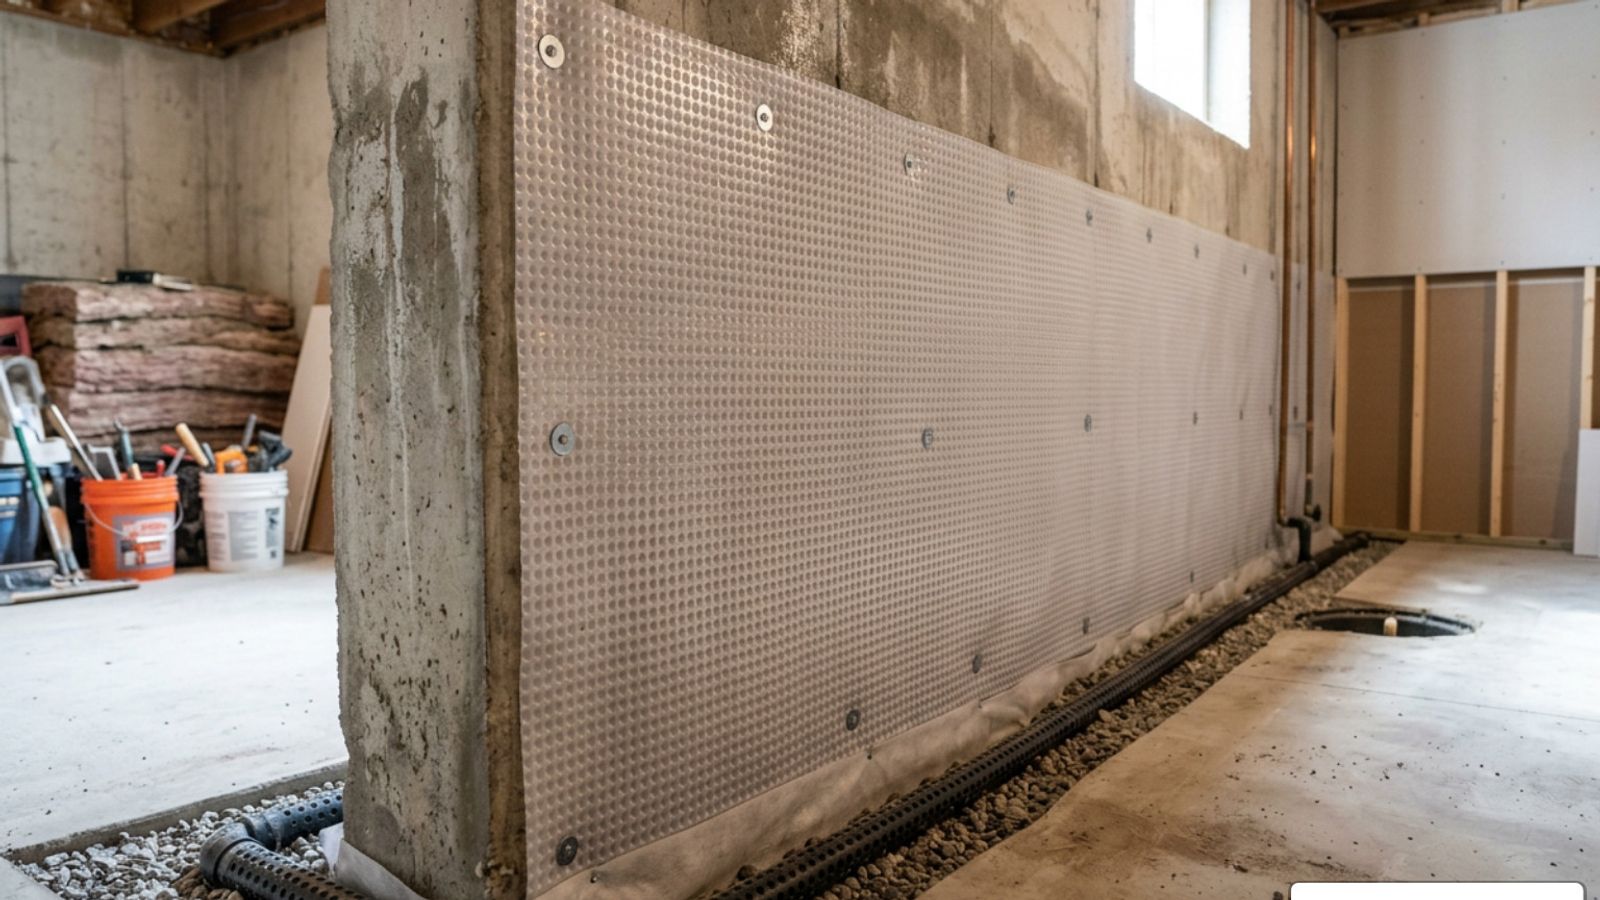
Relieves water pressure by routing water behind dimpled sheets
Primary Materials
Multi-coat cementitious slurries or elastomeric renders
High-Density Polyethylene (HDPE) dimpled membrane sheets
System Vulnerability
Hairline foundation settlement cracks can cause debonding
Requires mechanical pumps that depend on continuous power
Best Application
Dry-to-moderate soils with accessible, sound masonry
High water tables, active seepage, or historic brick/stone walls
As outlined in this technical basement tanking guide, successful Type A barrier tanking requires stripping walls down to bare, porous masonry, repairing mortar joints, and forming smooth 20–25mm cove fillets at wall-to-floor junctions. However, for total peace of mind in high-water-table areas, Type C cavity drainage membranes are widely considered the gold standard because they do not fight hydrostatic pressure; they manage water safely behind the scenes.
Sump Pumps, Drainage Channels, and Humidity Control
A Type C system relies on a perimeter French drain channel cut into the floor slab around the room's interior footprint. Water trickling behind the dimpled wall membrane enters these perforated channels, which slope toward a dedicated sump basin.
To protect your finished living area against storms and utility outages, your drainage package should always include:
- Dual Submersible Pumps: A primary pump to handle everyday ground moisture paired with an auxiliary pump positioned slightly higher in the basin to handle severe water surges.
- Battery Backup Inverters: Deep-cycle marine batteries and inverter systems that automatically keep pumps running if local power lines drop during heavy weather.
- High-Water Alarms: Smart sensors that alert your mobile phone if water levels in the basin rise above safe operational thresholds.
- Dedicated Dehumidification: Below-grade spaces naturally retain higher ambient moisture. Installing a whole-home or hardwired commercial-grade dehumidifier ensures indoor relative humidity stays within the optimal 40% to 50% range, permanently preventing mold spores and musty odors.
Heating, Insulation, and MEP Integration
Transforming a cold underground room into a warm, comfortable living zone requires integrating mechanical, electrical, and plumbing (MEP) systems designed specifically for below-grade environments.
Because basement temperatures differ from upper levels, tying your cellar into existing heating equipment often requires a dedicated secondary thermostat zone or a ductless mini-split heat pump. Radiant hydronic or electric underfloor heating installed beneath the finished floor provides uniform warmth while keeping wall space open for furniture.
For plumbing fixtures located lower than your home's municipal sewer line exit, a sealed sewage ejector pump or macerator unit is installed beneath the slab to lift wastewater up to the gravity sewer main.
Thermal Insulation and Soundproofing Below Grade
Below-grade wall assemblies must be insulated against thermal loss while preventing interstitial condensation. Warm indoor air meeting cold foundation walls creates dew points that cause moisture buildup within framing cavities.
To create an energy-efficient, moisture-resistant wall assembly:
Fasten continuous 2-inch extruded polystyrene (XPS) or closed-cell polyiso rigid foam boards directly to exterior masonry to create an uninterrupted thermal break.
Build non-load-bearing wood or light-gauge steel stud framing in front of the rigid foam, isolating the bottom wood plates with closed-cell sill gaskets.
Place moisture-resistant mineral wool batt insulation between the studs for superior fire resistance and thermal performance.
Air-seal the rim joists and floor perimeter using expanding closed-cell spray foam to block cold exterior air drafts.
If your converted space is beneath a busy living room or kitchen, soundproofing the ceiling joists is essential. Installing mineral wool acoustic batts between floor joists, mounting drywall on resilient sound-isolation channels, or installing acoustic quilt layers prevents footstep vibration and airborne noise from transferring between floors.
Lighting Strategies and Natural Daylight Solutions
Without thoughtful design, subterranean spaces can risk feeling enclosed. A balanced lighting plan makes the space feel naturally open and connected to the rest of the home:
- Egress Lightwells: Deep exterior window wells fitted with clear walk-on safety glass or metal grating channel natural sunlight downward into primary living zones.
- Layered Architectural Lighting: Combine low-profile, glare-free recessed LED ceiling fixtures on dimmer switches with perimeter cove accent lighting and wall sconces to eliminate dark corners.
- Staircase Light Transmission: Installing open-riser stairs, glass balustrades, or positioning the stairwell beneath an upper-floor skylight channels borrowed daylight down into the lower level.
- Tunable Color Temperature: Use smart LED lighting fixtures capable of shifting from energizing daylight white (4000K–5000K) during daytime work hours to warm amber tones (2700K) in the evening.
Design Concepts and Functional Layouts
The layout of your cellar should group functional zones around natural lighting and utility access. Place primary living areas, home offices, and entertainment hubs near stairwells and egress windows to maximize light, while tucking bathrooms, mechanical systems, wet bars, and storage areas into darker, interior corners.
Whether you are converting a compact layout or a spacious 1000 sq ft basement, planning your floor plan around foundation support posts and ductwork helps create clear, natural circulation paths.
Popular Room Ideas When Converting a Cellar
Earth-sheltered foundations provide built-in sound dampening, stable seasonal temperatures, and a naturally quiet atmosphere:
- Acoustic Home Theaters: The surrounding earth acts as a natural sound barrier, making cellars the perfect environment for custom home cinemas, surround-sound media lounges, and gaming rooms.
- Dedicated Home Gyms: Heavy gym equipment, free weights, and treadmills place zero stress on reinforced concrete ground slabs, eliminating floor vibrations throughout upper levels.
- Private Home Offices: Tucked away from main-floor household activity, a dedicated lower-level workspace provides an uninterrupted environment for remote meetings.
- In-Law or Guest Suites: Complete with an egress window, private bathroom, and closet space, lower-level suites offer private accommodations for visiting family, aging parents, or adult children.
- Custom Wine Tasting Rooms: Utilizing natural below-grade cooling to maintain consistent temperatures for proper wine storage, complemented by custom millwork, tasting islands, and stone accents.
Budget Breakdown, Timelines, and Value Addition
A cellar conversion represents a substantial investment that enhances your daily living space while growing long-term property equity. When evaluating structural choices, moisture barriers, and architectural layouts for remodeling Lehigh Valley homes, total investment levels reflect the specific requirements of below-grade construction.
Key Cost Factors When Converting a Cellar
Several site conditions influence your overall budget:
- Foundation Condition and Height: Spaces with adequate clear headroom cost less to complete than older cellars that require structural underpinning, slab excavation, or foundation crack repairs.
- Waterproofing Scope: Installing a full internal cavity drainage membrane system, dual sump pumps, and perimeter French drains requires specialized trade labor and dedicated equipment.
- Plumbing and Waste Ejection: Adding a full bathroom or wet bar requires breaking concrete to install subterranean drain pipes, venting stacks, and a sewage ejector pump basin.
- Structural Modifications: Removing interior bearing walls or masonry piers to create an open-concept floor plan requires engineering calculations, structural steel I-beams (RSJs), and temporary shoring.
- Level of Finish: Custom millwork, soundproofing clips, designer tile, and high-end lighting will adjust your overall finish budget compared to standard drywall and luxury vinyl plank installations during your basement finishing project.
Professional Contractors vs. DIY Feasibility
While DIY-inclined homeowners can tackle surface cosmetic tasks like interior painting or assembling flat-pack furniture, the core phases of a cellar conversion require licensed trade specialists:
- Structural Safety: Incorrectly excavating near foundation footings or removing structural piers can cause severe foundation settlement and catastrophic structural cracking across upper floors.
- Waterproofing Warranties: Professional waterproofing contractors supply insurance-backed warranties that protect your home investment and satisfy future buyers during title transfers.
- Code Compliance: Licensed contractors manage permit applications, coordinate trade inspections (rough framing, plumbing, electrical, and insulation), and secure final certificates of occupancy from municipal building officials.
Frequently Asked Questions About Cellar Conversions
How much does a typical cellar conversion cost?
Total investment varies depending on existing head height, foundation dampness, plumbing needs, and finish selections. Projects that require lowering the concrete floor, underpinning stone walls, or cutting egress wells through thick masonry sit at the upper end of the investment spectrum compared to standard conversions of dry, full-height spaces.
How long does it take to convert an existing cellar?
A straightforward single-room fit-out in a dry cellar with sufficient headroom typically takes 6 to 8 weeks on site. More extensive conversions involving structural underpinning, concrete slab pours, full bathrooms, and custom built-ins usually take 10 to 16 weeks from initial excavation to final trim work.
Will converting a cellar add measurable value to my home?
Yes. Converting an unused cellar into permitted, fully code-compliant living space adds legal heated square footage to your property. In competitive real estate markets, homes with finished below-grade living areas consistently command higher appraisal valuations and broader buyer interest than properties with unfinished basements.
Conclusion
Converting an unconditioned cellar into a refined, functional living space is one of the smartest ways to expand your home's usable square footage without compromising exterior yard space. By taking a moisture-first approach, prioritizing structural integrity, and installing code-compliant egress and mechanical systems, you can create a quiet, comfortable retreat that adds lasting equity and comfort to your home.
At Sure-Fix Remodeling, we combine expert design, structural craftsmanship, and proven moisture-management techniques to turn underutilized spaces into high-performance living areas. Explore our expert basement conversion services or visit our design showroom to start planning your home transformation.