Blog· August 27, 2026
How to Minimize Dust During Renovation Fast by Using Simple Barriers
Why Effective Bathroom Renovation Dust Control Matters
To minimize dust fast during a renovation using simple barriers, seal the room perimeter floor-to-ceiling with 6-mil polyethylene sheeting mounted on spring-loaded poles, install heavy-duty peel-and-stick zipper doors, cover all HVAC supply and return vents, and establish negative air pressure using a HEPA air scrubber vented out an exterior window. This barrier envelope traps airborne particulates at the source and stops debris from migrating into living areas.
Dust control is not simply a matter of housekeeping; it is an essential safety and air quality protocol. An uncontained tear-out can quickly disperse billions of microscopic particles across your home. Approximately 85% of homeowners cite job site dust as the most frustrating inconvenience during a remodel. When tearing down tile surrounds, cutting drywall, or breaking mortar beds, airborne particle counts spike to extreme levels. Without containment, this particulate matter can linger in living spaces for five to six weeks.
When planning a project with our Bathroom Remodeling Complete Guide 2026, establishing a comprehensive containment plan is the first milestone. Unchecked debris damages hardwood flooring, clogs electronics, coats furniture, and triggers smoke detectors. A structured approach treats home preservation as an engineering priority rather than an afterthought.
Health Risks of Microscopic Silica and Drywall Particles
Demolishing bathroom tile, backer boards, and mortar generates respirable crystalline silica dust. OSHA identifies crystalline silica as a severe health hazard capable of causing chronic bronchitis, silicosis, and long-term lung complications. These quartz particles measure less than 1/30th the width of a human hair. Because they are microscopic, they bypass the upper respiratory system and settle deep within the lungs.
Drywall removal introduces fine gypsum dust and talc, which irritate eyes and airways. Furthermore, in homes built before 1978 across Pennsylvania and New Jersey, demolition can disturb lead-based paints or legacy building materials. Under the EPA Lead Renovation, Repair and Painting (RRP) Rule, strict containment and HEPA-grade filtration are required to prevent dangerous toxic dispersion.
Protecting HVAC Ductwork and Living Areas
Forced-air heating and cooling systems can act as an unintended distribution network during construction. If a return air register remains open during tile demolition, the blower fan pulls fine drywall and silica grit directly into your ductwork, dispersing it into every bedroom and living space.
To prevent whole-house contamination:
- Turn off the central HVAC system during high-dust demolition phases.
- Seal all supply registers and return air grills inside the bathroom using 6-mil plastic sheeting and painter's tape or magnetic register covers.
- Isolate the room mechanically to prevent pressure imbalances from pulling debris into wall cavities.
- Implement a 3-stage furnace filter replacement cadence: install a fresh high-MERV filter at project kickoff, replace it midway through drywall work, and install a final new filter once post-construction cleanup is complete.
Setting Up Simple Containment Barriers and Room Isolation
Reliable containment relies on establishing an airtight physical barrier between the bathroom and adjacent living quarters before any tool touches a wall. Whether you are tackling a minor update or full Home Remodeling, basic drop cloths are insufficient. You need an isolated envelope.
Step-by-Step Poly Sheeting and Zipper Door Installation for Bathroom Renovation Dust Control
Building a secure barrier is straightforward when using high-grade materials and proper mechanical tension:
Select Heavy-Duty Sheeting: Use 6-mil string-reinforced or antistatic polyethylene plastic sheeting. Thin 1-mil or 2-mil painter's drop plastic tears under air pressure shifts and foot traffic.
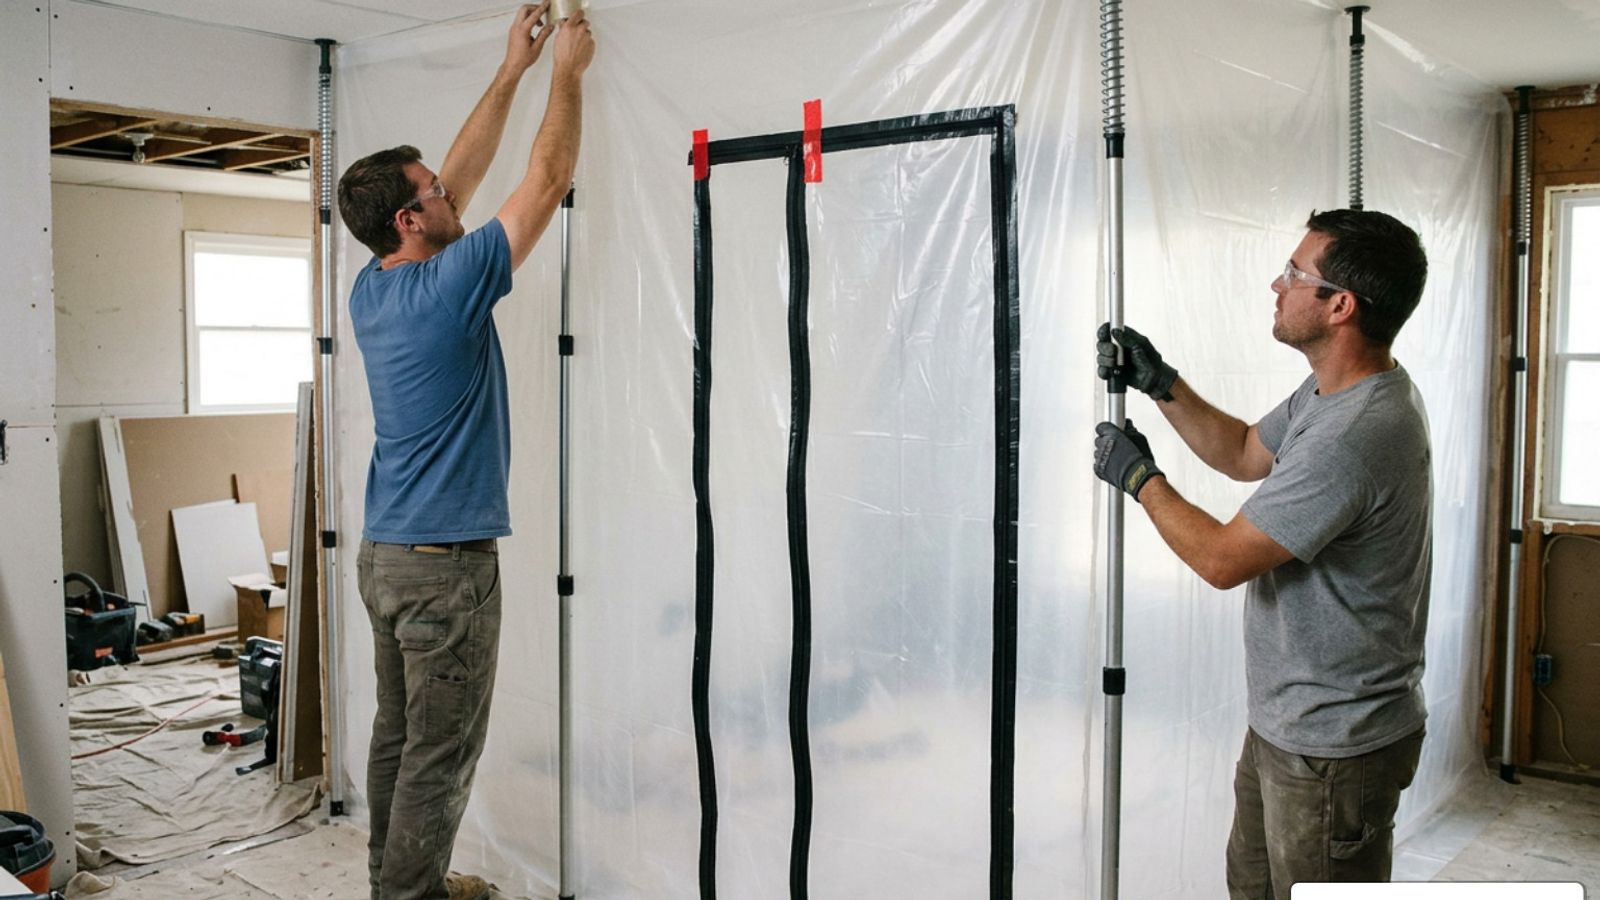
Erect Spring-Loaded Barrier Poles: Position adjustable, spring-loaded dust barrier poles roughly 4 to 5 feet apart across the doorway or hallway anteroom. Lock the poly sheeting firmly against the ceiling using padded top plates.
Seal the Perimeter: Overlap the plastic sheeting against the wall trim and flooring by at least 12 inches. Secure the edges continuously from ceiling to floor using blue or green delicate-surface painter's tape to avoid peeling paint upon removal.
Install Heavy-Duty Peel-and-Stick Zippers: Apply two heavy-duty adhesive zippers vertically, approximately 3 feet apart, onto the tensioned plastic. Unzip them completely and cut the plastic underneath with a utility knife to create an easy roll-up access doorway.
Construct an Airlock Flap: For high-dust demolitions, hang a secondary overlapping plastic sheet over the zipper entry to create a dual-barrier airlock.
Establishing Negative Air Pressure and Buffer Zones
Physical plastic barriers keep dust from drifting, but airflow dynamics provide absolute containment. Negative air pressure occurs when air is actively exhausted from the work area faster than it can enter, creating a vacuum effect. If there is a small tear or an open zipper, air rushes into the bathroom from the hallway rather than allowing dust to blow outward into your home.
To create this setup:
- Place a commercial HEPA air scrubber inside the bathroom or immediately outside the containment wall.
- Attach flexible ducting to the unit's exhaust port and vent it out a nearby sealed window opening.
- Ensure the air scrubber provides at least 6 to 8 complete room air changes per hour (ACH).
- Establish a 3-foot anteroom or decontamination zone outside the bathroom where technicians can vacuum protective suits and step onto tacky mats before entering main corridors.
Clean Deconstruction and Low-Dust Demolition Techniques
Traditional demolition often relies on heavy sledgehammers that pulverize sheetrock and mortar into fine clouds. Clean deconstruction, by contrast, removes fixtures methodically in reverse order of installation. When converting an outdated setup through a Bathroom Remodel Tub to Walk in Shower or executing a complete Bathroom Conversion, strategic disassembly drastically cuts airborne waste.
Demolition Method
Particulate Generation
Dust Reduction Strategy
Resulting Air Quality Impact
Dry Jackhammering / Smashing
Extreme (700k+ particles/cu.ft.)
None
Severe whole-home contamination risk
Manual Prying & Scoring
Moderate (200k particles/cu.ft.)
Score drywall joints; pry tile whole
Manageable settled debris
Point-of-Source Shrouded Tools
Low (<80k particles/cu.ft.)
HEPA extractor on grinders/saws
90% capture at contact point
Wet Demolition Techniques
Minimal (<40k particles/cu.ft.)
Water misting suppression & wet saw
80% to 90% total dust reduction
Surgical Fixture Removal and Wet Demolition Practices
Rather than smashing drywall, score joints with a sharp utility knife to remove intact wall panels in large sections. Pry tiles from wall studs using a flat pry bar instead of striking them with hammers.
Applying light water misting to plaster, tile grout, and backer board prior to scraping suppresses airborne particles by up to 90%. Controlling dust at the point of origin minimizes reliance on room air scrubbing alone. For heavy debris, pack waste directly into heavy-duty disposal bags inside the room rather than transporting loose rubble through the house.
Point-of-Source Tool Extraction for Bathroom Renovation Dust Control
Power tools used for grinding mortar, cutting cement backer board, or trimming tile generate significant friction dust. Using power tools fitted with dust-collection shrouds connected directly to a certified HEPA vacuum captures up to 90% of particulate before it enters the room's air envelope. When cutting tile, set up a dedicated continuous-spray wet saw outdoors or in a fully shielded garage bay.
Protecting Floors, Thoroughfares, and Adjacent Living Spaces
Dust containment extends beyond the bathroom perimeter. Foot traffic between the staging truck and the workspace can quickly grind abrasive construction debris into finished flooring throughout your hallways. When undertaking Bathroom Remodeling Bethlehem projects, protecting these transit pathways is an absolute priority.
Heavy-Duty Floor Board and Adhesive Carpet Films
Standard canvas drop cloths bunch up, slide, and allow liquids and fine dust to bleed through to the floor beneath. Professional home protection requires rigid, non-porous barriers:
- Hardwood, Tile, and Laminate: Install heavy-duty impact boards (such as Ram Board) along the entire pathway. Tape all seams with breathable vapor tape, and secure outer perimeter edges with finish-safe painter's tape.
- Carpeted Stairs and Hallways: Apply puncture-resistant, self-adhesive polyethylene carpet protection film. This creates a non-slip, waterproof barrier that locks out fine grit.
- Doorways and Corners: Install reusable foam corner guards and jamb jackets along tight hallway turns to prevent gouges and dings from toolboxes and material hauling.
Daily Site Decontamination and HEPA Cleaning Routines
Never allow construction dust to accumulate overnight. Routine daily maintenance keeps the worksite safe and prevents migration:
Ban Standard Dry Sweeping: Sweeping with a standard broom launches settled silica and drywall particles back into the air.
Vacuum with Certified HEPA Units: Use an industrial vacuum fitted with a true HEPA filter capable of capturing 99.97% of particles down to 0.3 microns.
Execute Damp-Wipe Decontamination: Wipe down horizontal plastic barriers, door frames, and staging surfaces using damp microfiber cloths.
Maintain Sticky Walk-Off Mats: Position multi-sheet adhesive tacky mats directly outside the zipper barrier door and at the home's exterior exit. Peel away soiled layers daily so work boots never transfer grit to clean living areas.
Frequently Asked Questions About Bathroom Dust Containment
How long does construction dust stay airborne after a bathroom remodel?
Without active mechanical ventilation, fine drywall and silica dust particles remain suspended in ambient air for 24 to 48 hours before settling onto surfaces. Running a dedicated HEPA air scrubber continuously during demolition and for 4 to 6 hours after work concludes clears the air volume efficiently.
What is the best way to seal HVAC registers during demolition?
Cover supply and return vents inside the work zone with elasticized virgin polyethylene duct caps or 6-mil plastic taped securely around the outer trim. For added security, place magnetic vent covers over metal registers to form an airtight seal, and turn off system fans during high-impact demolition.
What dust containment questions should you ask a contractor before hiring?
Before signing a contract, ask the following questions to verify their site protection standards:
- Do you establish floor-to-ceiling plastic containment walls with zipper doors?
- Will you set up continuous negative air pressure with a HEPA air scrubber vented outside?
- What specific materials do you use to protect hardwood floors and carpets along transit paths?
- Do you use shrouded power tools with HEPA vacuum extraction for cutting and grinding?
- What is your daily cleanup protocol at the end of each workday?
Conclusion
A successful bathroom remodel should bring comfort and improved functionality to your home without leaving a layer of grit across your living spaces. By establishing durable 6-mil plastic containment walls, running negative air pressure systems, utilizing shrouded tools, and protecting floor thoroughfares, you can keep your home clean throughout the entire renovation.
At Sure-Fix Remodeling, we believe that treating your living space with care is just as essential as the craftsmanship we put into our tile, plumbing, and cabinetry work. Explore our complete Bathroom Remodeling Services to see how our team delivers clean, professional, and lasting transformations for homes across Eastern Pennsylvania and Western New Jersey.