Blog· August 6, 2026
A Comprehensive Guide to Remodeling a 1970s Split Level
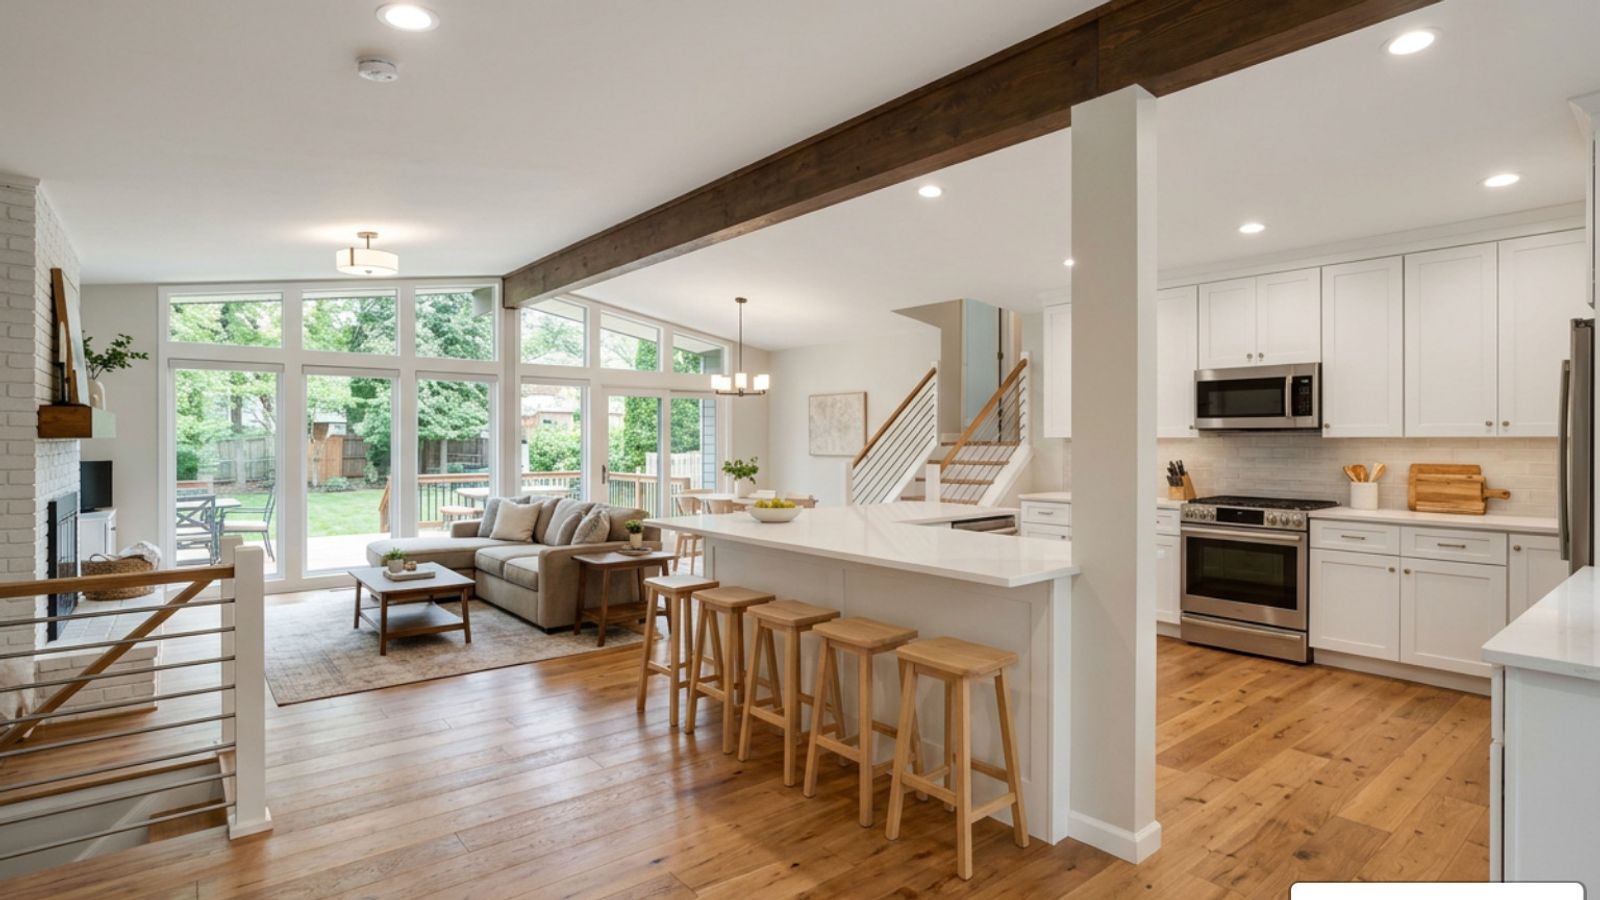
Overcoming Structural and Layout Challenges in a 1970s Split Level Remodel
When entering an original 1970s split-level, the layout challenges are immediately noticeable. The compartmentalized floor plans favor isolated, boxy rooms over fluid, light-filled spaces. Heavy structural walls divide the kitchen from the living room, creating dark corridors and obstructed sightlines across the staggered floor levels. Modernizing these homes through comprehensive Home Remodeling requires balancing spatial openness with structural safety.
The primary architectural challenge stems from how split-level homes support weight. Load-bearing walls often bisect the main floor, carrying load from the roof rafters down through intermediate mid-level joists. Eliminating these barriers requires precise engineering calculations to prevent floor sagging or ceiling collapse.
Opening Up Boxy Floor Plans and Load-Bearing Walls
Transforming a closed floor plan into an expansive, airy living space requires replacing central dividing walls with structural support beams. During wall removal, contractors install temporary 2x4 support posts to support the ceiling joists while erecting engineered beams.
Homeowners can choose between two structural beam options:
- Flush ceiling headers: The support beam is recessed directly into the attic framing or ceiling cavity, yielding a completely flat, seamless ceiling finish across the unified space.
- Exposed beam designs: The support beam sits immediately below the ceiling surface, providing a natural architectural feature that helps visually anchor separate kitchen, dining, and living zones.
Beyond removing interior walls, vaulting ceilings by opening the roofline dramatically reshapes the split-level aesthetic. Adding skylights along elevated roof planes channels daylight deep into central living zones.
For projects where budget or structural constraints make complete open-concept layouts impractical, 1970s Split-Level Remodel: What to Change Behind the Shag and Paneling | ArchitectureCourses.org recommends controlled wall openings. Pass-through openings, widened doorways, and half-walls preserve critical wall space for furniture backing and cabinet storage while improving light transmission across living areas.
Hazardous Material Remediation and Mechanical Upgrades
Before demolition begins, testing for hazardous construction materials common in 1970s homes is mandatory. Homes built prior to 1980 frequently utilized asbestos in popcorn ceiling textures, drywall joint compounds, floor tile adhesives, and ductwork insulation. Pre-1978 properties must also follow lead paint safety precautions.
Behind drywall surfaces, vintage mechanical systems often require comprehensive upgrades:
- Electrical systems: Branch circuits from the 1970s may feature aluminum wiring, which presents fire hazards if not retrofitted with appropriate connectors. Outdated breaker panels must be replaced with modern 200-amp service panels to safely power contemporary appliances and smart tech.
- HVAC systems: Undersized, uninsulated ductwork soffits often choke airflow across split levels, creating significant temperature variances between upper bedrooms and lower living areas. Re-routing flexible or rigid ductwork through floor cavities ensures balanced thermal comfort throughout the home.
Building Material
Common 1970s Risk Factor
Remediation & Safety Requirement
Popcorn Ceiling Texture
Asbestos fibers
Certified professional abatement or encapsulation
Drywall Mud & Joint Compound
Asbestos additives
Certified lab testing before cutting or sanding
Pre-1978 Paint Coats
Lead dust hazard
EPA Lead-Safe certified containment work
Branch Electrical Wiring
Aluminum conductors
Panel replacement and COPALUM or AlumiConn remediation
Galvanized Plumbing Pipes
Mineral corrosion/leaks
PEX or copper supply line replacement
Transforming the Kitchen: Layouts, Finishes, and Costs
Original 1970s kitchens were designed as narrow, hidden workrooms separated from family life. Modernizing a split-level kitchen involves removing dividing walls and integrating custom storage, high-performance finishes, and inviting seating areas. These upgrades can be explored further through our approach to Custom Kitchen Renovations and ideas for a Kitchen Redo on a Budget.
Designing Open-Concept Kitchens and Custom Islands
Opening a split-level kitchen establishes direct visual connection with adjacent living and dining rooms. Positioning a central island along the footprint of the removed wall maintains structural boundaries while expanding functional prep space.
Key design features for modern split-level kitchens include:
- Seating islands: A multi-functional 6-person seating island accommodates informal dining, meal prep, and family gatherings.
- Quartz countertops: Durable non-porous quartz surfaces offer heat and stain resistance without requiring ongoing sealing.
- Two-tone cabinetry: Combining deep wood-toned lower cabinets with light-colored upper uppers lightens visual weight while bringing natural warmth into the space.
- Custom storage solutions: Installing a custom buffet wall or dedicated pantry cabinet featuring internal wooden pull-out drawers recovers lost storage space from removed upper wall cabinets.
- Banquette seating: Tucking a built-in bench seating nook near stair transitions establishes an intimate dining hub within an open layout.
When reconfiguring layouts, homeowners often reference case studies like the Split Level House Kitchen Remodel | Four Generations One Roof to see how removing walls creates space for dual-sink layouts and expanded work triangles. Those looking for inspiration from neighboring architectural eras can also explore our guide on 1960s Kitchen Remodel techniques.
Budget Breakdown and Hidden Renovation Expenses for a 1970s Split Level Remodel
Budgeting for a 1970s split level remodel requires accounting for both visible finishes and hidden infrastructure updates. Structural wall removals, load-bearing beam installations, and moving plumbing lines through concrete slabs or mid-level subfloors represent significant investments that require expert execution.
A typical project timeline covers:
Design and Permitting (4 to 6 weeks): Draft architectural drawings, calculate beam load calculations, and submit documents for municipal code review.
Construction and Installation (6 to 12 weeks): Complete structural demolition, abatement, mechanical rough-ins, drywall, cabinet installation, and final finish work.
Detailed cost factors and structural options should be thoroughly calculated before construction begins. Homeowners looking to refresh existing cabinetry while preserving layout integrity can consult our guide on 1960s Kitchen Cabinet Makeover strategies.
Reimagining Entryways, Stairwells, and Multi-Level Transitions
The central entry landing is often the main functional bottleneck in a 1970s split-level home. Original foyers feature narrow landings squeezed between short staircases leading up to the main floor and down to the lower level, forcing immediate traffic jams at the front door. Resolving these spatial limitations requires smart railing updates, expanded door clearance, and thoughtful visual curation, similar to the concepts gathered in 42 1970s split level rehab ideas.
Maximizing Foyer Space and Modernizing Railings
Modernizing a split-level entryway focuses on expanding sightlines and improving foot-traffic flow:
- Built-in storage half-walls: Replacing dated wrought-iron or heavy wood banisters with low-profile pony walls incorporating built-in shelving, shoe cubbies, or bench seating optimizes landing utility.
- Modern banisters: Installing slim steel balusters, horizontal cable railings, or tempered glass panels opens up sightlines between intermediate floor levels.
- Natural light enhancements: Replacing solid wood doors with glass front doors, full-height sidelights, or transom windows fills the foyer with natural light.
- Mudroom integration: Extending front landing walls or repurposing adjacent closets creates built-in drop zones for outerwear and shoes.
Homeowners evaluating entryway transformations often review success stories like the Split Level Home Remodel Ideas | Four Generations One Roof, which demonstrates how updating entry staircases and floor layouts increases home value and market appeal.
Floor Material Transitions Across Staggered Levels
Selecting durable materials that flow seamlessly across staggered stair landings creates visual continuity across multi-level floor plans. Combining different flooring types at short stair runs visual fragments spaces, making the home feel smaller.
Recommended flooring strategies include:
- Unified flooring materials: Running wide-plank engineered hardwood or waterproof luxury vinyl plank (LVP) continuously across living, dining, and kitchen zones eliminates choppy floor transitions.
- Stair tread matching: Using custom-stained wood treads or square-nosed LVP stair caps unifies levels while providing long-term durability on high-traffic steps.
- Acoustic underlayment: Installing sound-dampening underlayment beneath hard surface flooring absorbs footstep noise between stacked floors.
For professional advice on selecting underlayment, leveling subfloors, and matching stair trims, explore our comprehensive guide to Flooring Installation.
Updating Exteriors and Modernizing Multi-Level Living Spaces
The asymmetrical exterior geometry of 1970s split-level homes can feel boxy and dated. Strategic exterior updates soften rigid elevations, enhance natural lighting, and boost curb appeal, as outlined in our approach to Exterior Remodeling and modern architectural guidelines.
Curb Appeal Transformations and Window Enlargements
Modernizing multi-tiered split elevations involves balancing horizontal layers while updating outdated building materials:
- Siding and masonry updates: Replacing aged vinyl or aluminum siding with durable fiber cement lap siding or board-and-batten panels breaks up boxy massing.
- Modern color palettes: Applying contemporary dark grey, charcoal, or warm white exterior paints paired with high-contrast trim softens multi-tiered facades.
- Window enlargements: Replacing small, original double-hung windows with expansive floor-to-ceiling glass assemblies fills interior living spaces with sunlight and modernizes exterior geometry.
- Porticos and porches: Adding covered front porches or porticos defines the entry door, shielding visitors from weather and creating a clear focal point.
- Modern garage doors: Upgrading outdated garage doors with glass-panel designs or carriage-style wood finishes balances the home's lower elevation.
Projects like How a 1970s Split-Level Became a Sophisticated Family Retreat · Haven highlight how balancing exterior cladding materials and enlarging window glass opens homes up to surrounding outdoor environments.
Smart Upgrades and Aging-in-Place Features in a 1970s Split Level Remodel
Adapting split-level architecture for long-term comfort requires integrating smart home technology and accessibility upgrades to navigate stair steps safely:
- Lower-level primary suites: Converting lower-level family rooms into primary bedroom suites featuring zero-threshold curbless showers, floating vanities, and walk-in closets minimizes main-stair reliance for aging homeowners.
- Emergency egress compliance: Installing code-compliant egress windows in lower-level bedrooms ensures safety, natural illumination, and legal compliance.
- Smart home systems: Integrating app-controlled smart thermostats, automated lighting controls, and keyless entry hardware simplifies multi-level home maintenance.
- Staircase safety enhancements: Installing wide, low-profile stair treads, continuous handrails, and motion-activated under-tread LED strip lighting reduces fall risks along stairways.
Homeowners considering lower-level living room conversions can find design and waterproofing advice in our guide on Basement Finishing.
Frequently Asked Questions about 1970s Split-Level Remodeling
How much does it cost to open up the kitchen in a 1970s split-level home?
Total investment depends on whether dividing walls carry structural roof loads and require engineered steel or LVL support beams. Expenses include temporary shoring, beam installation, rerouting electrical circuits or plumbing lines hidden within walls, installing new cabinetry, and finishing contiguous flooring.
Is it better to remove load-bearing walls or create controlled openings in split levels?
Complete load-bearing wall removal delivers maximum visual openness, daylight distribution, and direct sightlines across living areas. Controlled wall openings—such as widened pass-through windows, arched doorways, or half-walls—offer budget-friendly alternatives that preserve cabinet storage and acoustic privacy while improving light flow.
How do you make a boxy 1970s split-level entryway feel larger?
Expanding a cramped entry foyer involves replacing solid front doors with full-lite glass door assemblies, swapping heavy wood stair banisters for slim steel balusters or glass panels, installing built-in storage bench pony walls, and running continuous flooring across stair landings.
Conclusion
Remodeling a 1970s split-level home allows you to convert a boxy, compartmentalized house into a modern, light-filled living space tailored to your lifestyle. Success relies on balancing structural updates with smart spatial planning:
- Prioritize structural integrity: Always consult professional structural engineers and obtain municipal permits before removing internal dividing walls or vaulting ceilings.
- Remediate early: Test for asbestos and lead, and plan for electrical panel and HVAC ductwork upgrades prior to decorative work.
- Optimize functional flow: Create open kitchen islands, widen tight entry foyers, update stair railings, and run continuous flooring across staggered levels.
- Enhance exterior elevations: Modernize boxy facades using fiber cement siding, contemporary paint palettes, enlarged windows, and functional front porches.
At Sure-Fix Remodeling, we bring over two decades of residential design-build expertise to every project across Eastern Pennsylvania, New Jersey, and New York. Our dedicated in-house showroom allows you to select premium cabinetry, countertops, tile, and trim options alongside design experts. Explore our complete line of design-build solutions on our Services page, or contact us today to schedule your design consultation!